


Setting the Time
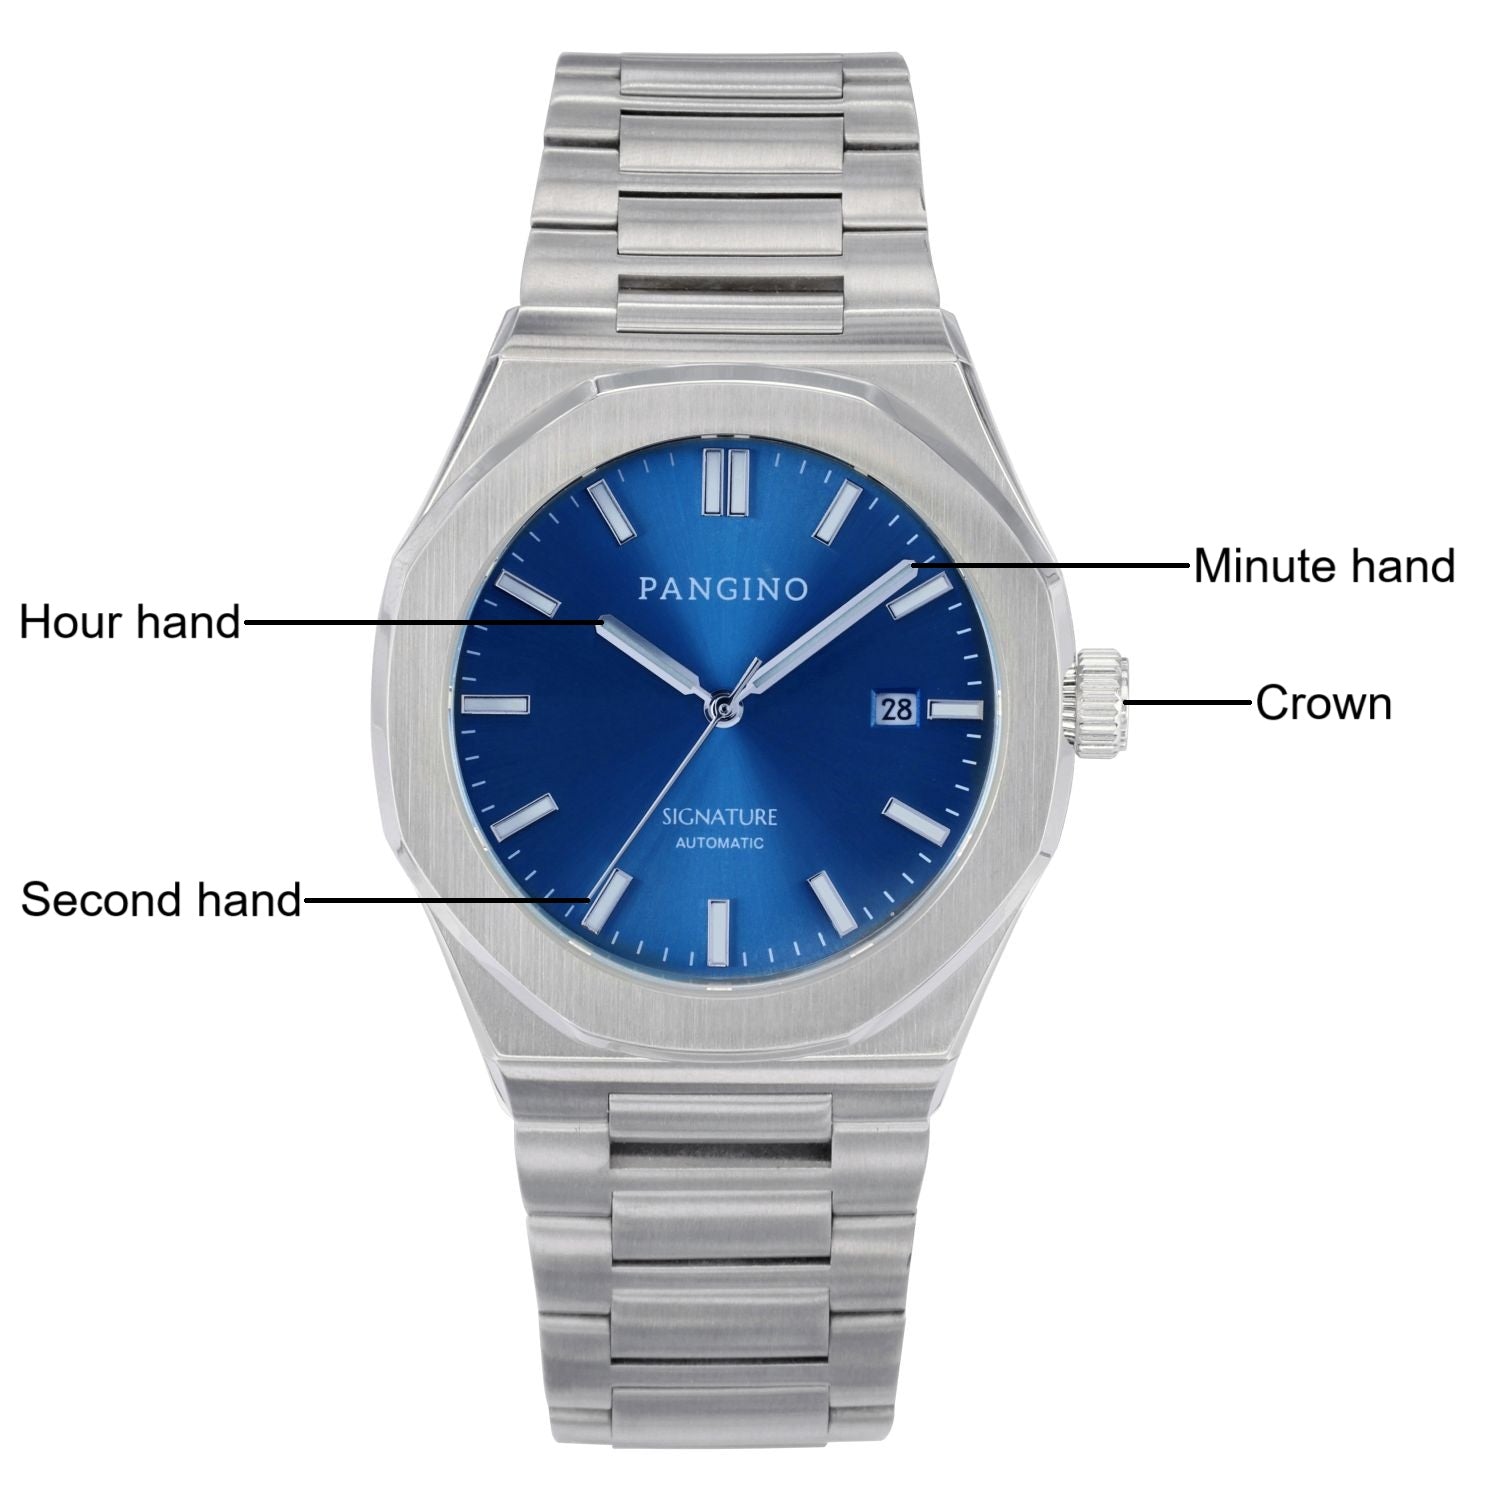
- Pull the crown out to the second position (two clicks).
- Turn the crown to set the hour and minute hands to the proper time.
- Push the crown back into the normal (original) position once the time is selected. You will then need to wind your automatic watch for it to begin keeping time. Learn more about this process in the “winding your automatic watch” section below.
Please note: The time setting instructions apply to all Pangino watches. Your automatic watch will need to be wound once set. Not all watches have a second hand, and so you may need to wait to see that your automatic watch is keeping time, as without a second hand a sweeping motion will not be visible.
If your automatic watch has a clear caseback, then you can simply look to see if the movement is in action to ensure the watch is keeping time. If a second hand is present, however, you will see it sweeping across the dial once the watch is set, adequately wound, and is keeping time.
Setting the Date
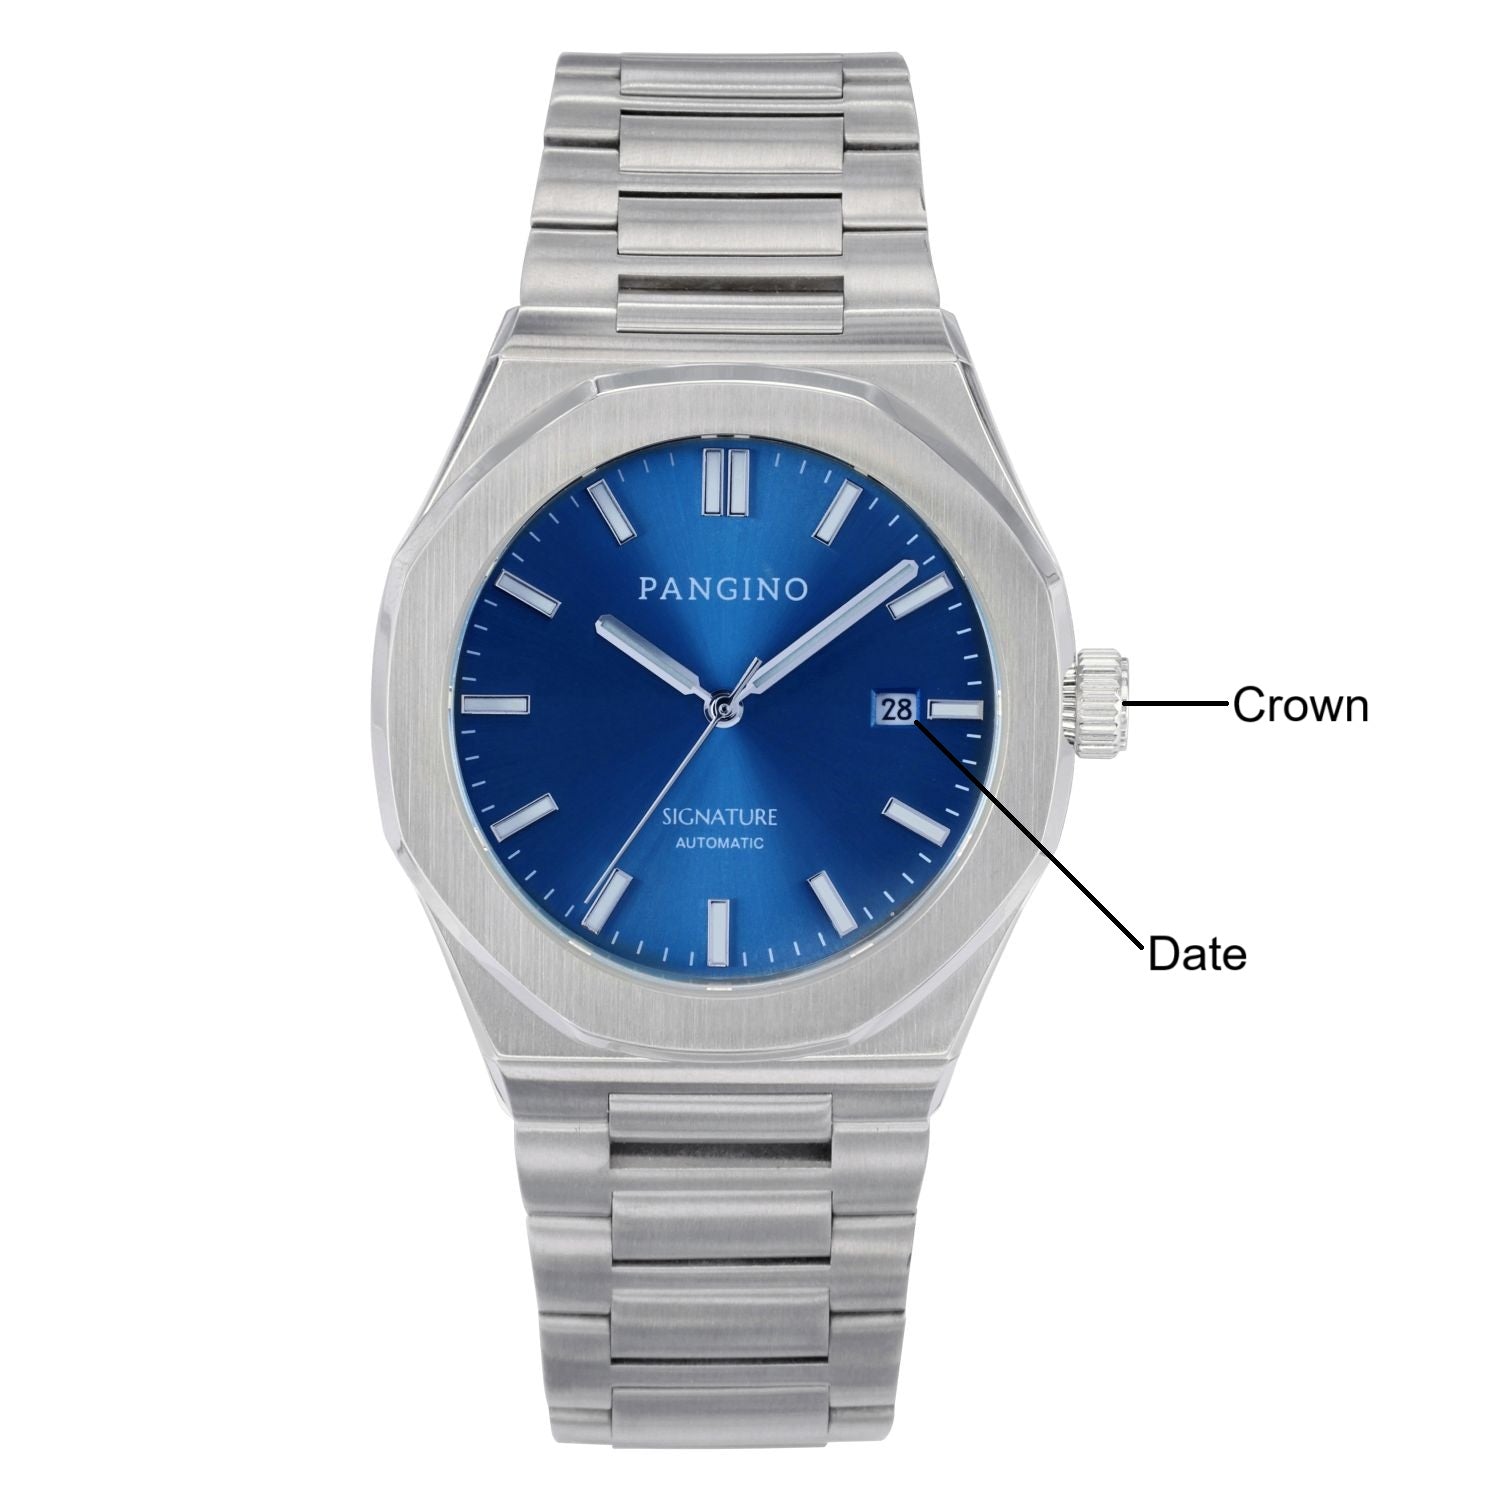
- Pull the crown out to the first position (one click).
- Turn the crown to select the date.
- Push the crown back into the normal (original) position once the date is selected.
Please note: The date setting instructions apply to all Pangino watches with date windows. Not all watches have a date window. We advise avoiding setting the date when the watch hands are pointing between the time of 8pm and 4am, as the gears for the date change are already in motion during these hours. Doing so may result in the date not changing properly, or could even damage the movement.
Winding Your Automatic Watch
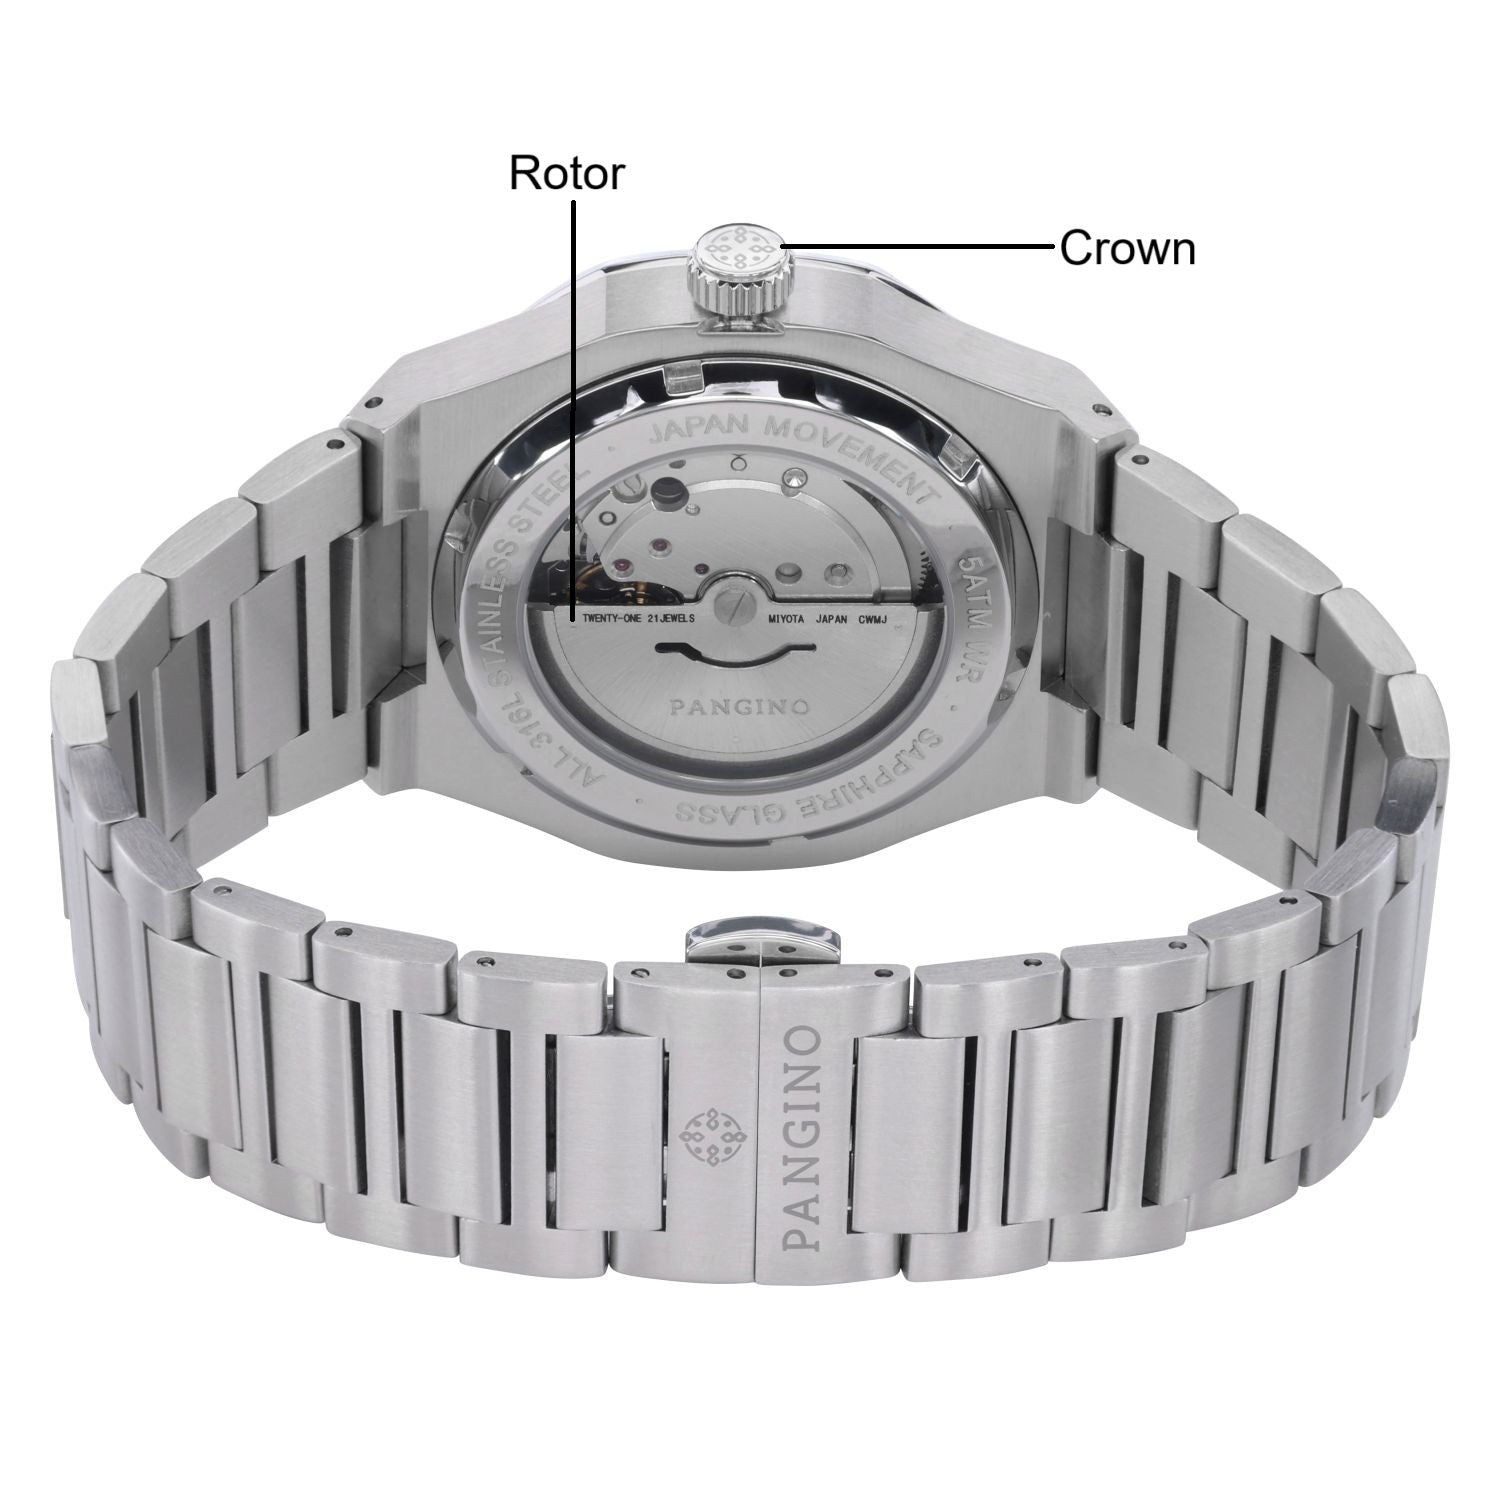
- Turn the crown clockwise while in its normal (original) position to wind the watch. Continue to turn the crown until the watch is sufficiently wound. Typically, you will need to wind the crown 30-40 times if it is not keeping time originally, especially if the watch has not been worn and the power reserve is drained. After being adequately wound, your automatic watch should start keeping time. If a second hand is present, then it will start moving in a sweeping motion. If a second hand is not present, then you can look to see if the movement is in action to ensure the watch is keeping time.
Please note: If your automatic watch is not keeping time when first received, it is because it needs to be wound in accordance with the winding instructions above. After being adequately wound, the watch will continue to power itself when worn through the self-winding of the rotor, which moves when your wrist is in motion.
When unworn for a duration longer than the power reserve (typically 40-42 hours for most automatic Pangino watches, although the exact duration depends on the movement), you will need to reset the time and wind the watch again. Do not turn the crown counter-clockwise, as this will not wind the watch.
Resizing Your Watch Bracelet
About the resizing process:
These instructions apply to Pangino watches with bracelets that utilize a push-pin mechanism to hold the links in place. If you do not have experience resizing watch bracelets, we strongly recommend taking your watch to a watch repair shop or reputable jeweler to get it done professionally. There is the possibility of scratching or damaging the watch if this process is not done correctly.
Pangino is not responsible for any scratches or damage incurred during the bracelet resizing process. A link removal tool is provided by us with every order, if you intend to complete this process yourself. The providing of this tool does not mean that Pangino encourages every customer to attempt this process themselves.
We reiterate that if you are unfamiliar with this process, we strongly advise taking the watch to a professional. Additional tools not provided by Pangino may also be needed during this process, which are the sole responsibility of the customer to acquire, and not the responsibility of Pangino to provide.
Special note regarding plated watches: Be especially careful when resizing the bracelet of a plated watch. Links can often be more difficult to remove on plated watches, and there is also a greater risk of scratching or damaging a plated watch during the resizing process. If you are inexperienced with this process or encounter any resistance during this process, you should take your plated watch to a reputable jeweler or watch repair shop to get the bracelet resizing process performed professionally.
How to resize your watch bracelet:
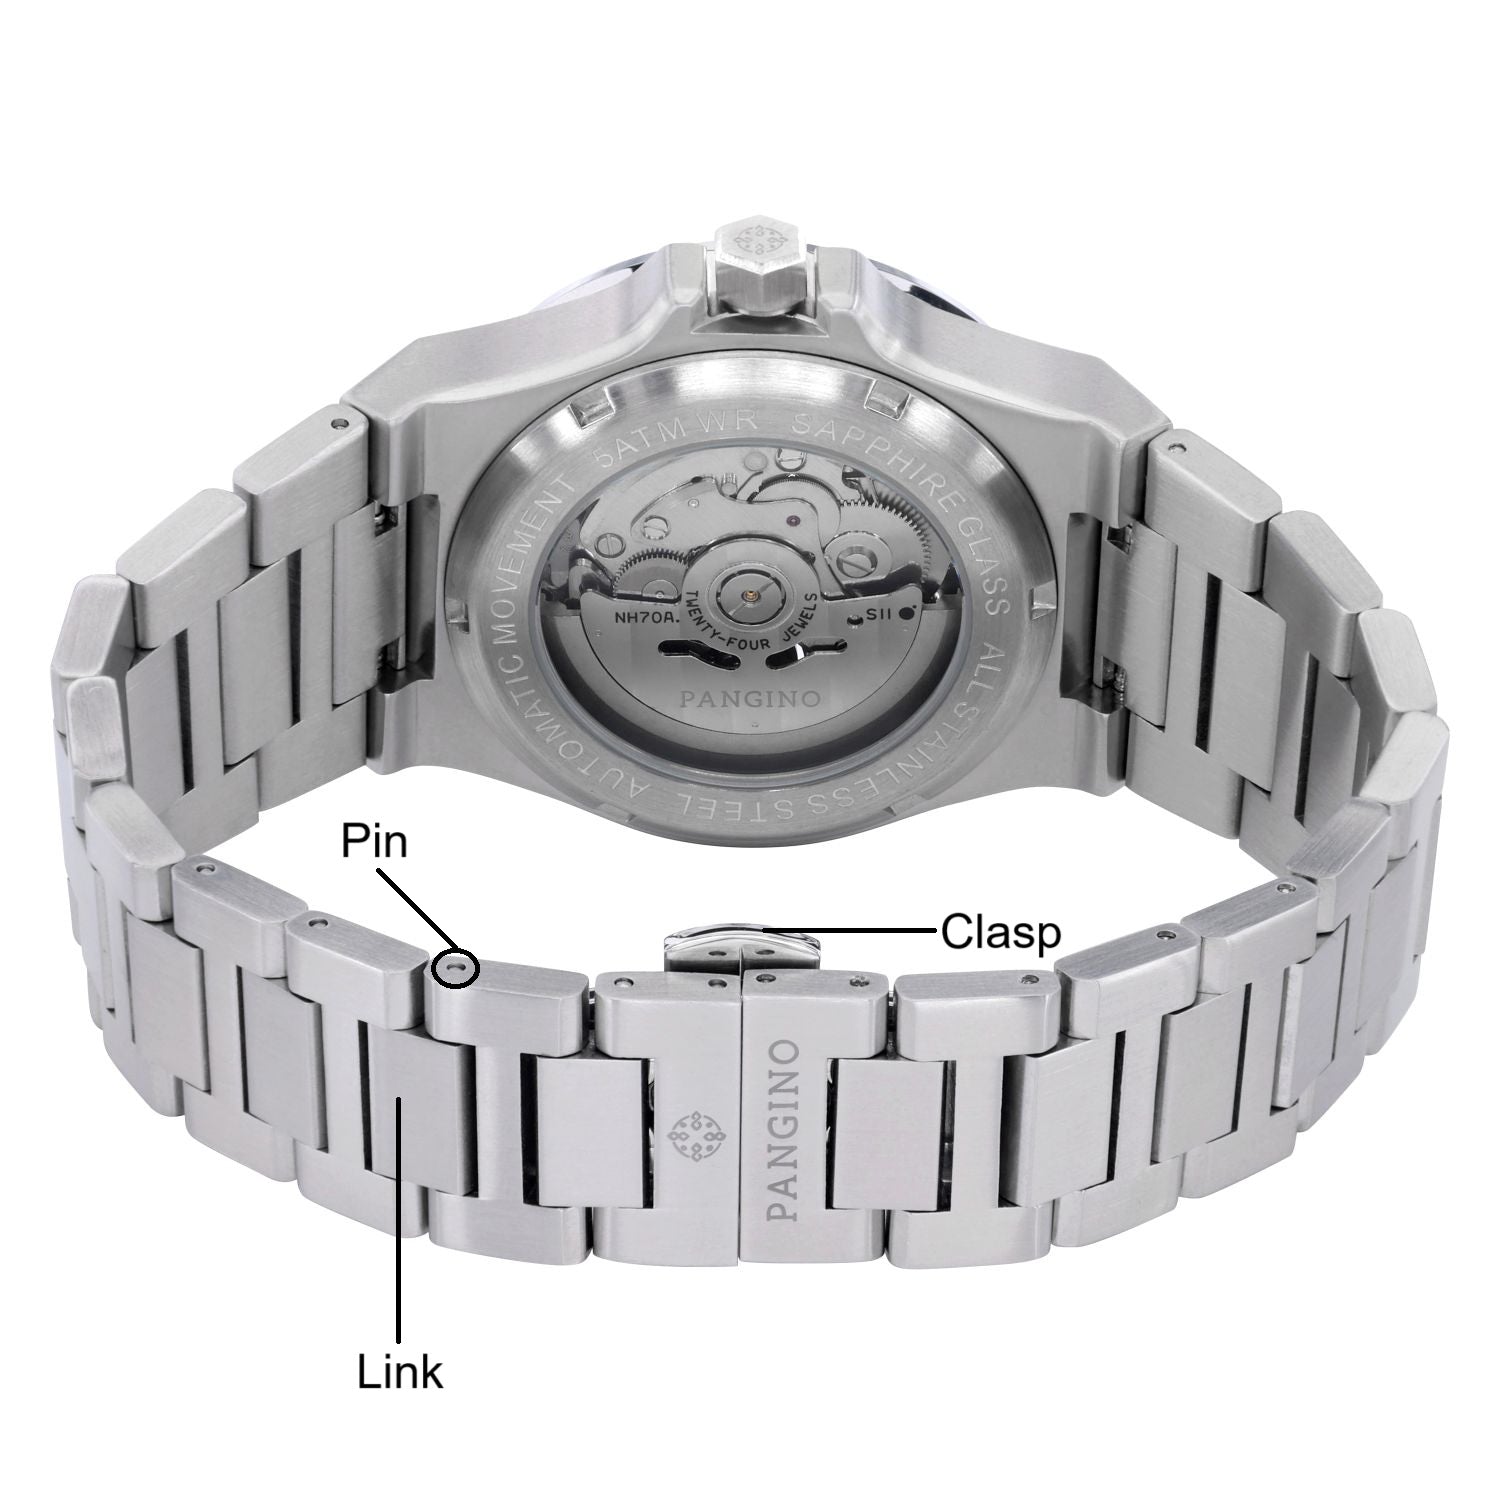
Step 1
Prepare your work space by ensuring you are working on a flat surface. We also advise keeping the watch itself on a soft surface to avoid any scratches. Ensure the end piece/small pin pusher that goes on the link removal tool is present and tightly secure.
If it is not present, then place one at the end of the link removal tool and secure it using the end fastener that should be placed over it (the other part that screws along the grooved end of the link removal tool).
Step 2
Place the watch on your wrist and close the clasp. Roughly estimate how many links should be removed in order to fit your wrist. We advise trying to remove an equal number of links from either side of the bracelet if possible, so that the clasp is centered when closed.
Step 3
Place the bracelet on the link removal tool. Adjust the circular platform to raise or lower the bracelet as needed to get the best position where the pin can most easily be pushed out of the pinhole. Ensure that the pinhole of the bracelet link whose pin you are removing is centered in between the gap of the link removal tool’s base, so that the pin will be pushed in between the gap, and not into the base of the tool itself.
Step 4
Use the link removal tool to push the pin of the chosen link outwards towards the direction indicated by the arrow on the back of the link. Twist the tool downwards until the pin is almost completely out. Do not twist the tool all the way down until it is touching the link itself. Then, pull out the pin manually. A longer pin pusher tool (not provided by Pangino) may need to be used to push out some more stubborn pins all the way.
Proceed to repeat this process slowly and carefully by removing one or two links from either side first, and then progress to remove more links as needed to get the best fit. Continue this process until enough links are removed so that the watch can fit your wrist in a comfortable manner when the clasp is closed, and that it is not too tight or too loose. You can test the exact fit once the pins are added back and the links are connected again, which is covered in step 5.
Take your time during this process and be patient. If you encounter too much resistance from a particular pin, do not try and continue to force it. Instead, you should take it to a professional at this point. Once the pins and links have been removed, be sure not to lose them.
Step 5
Once you have removed the sufficient number of links required to get the watch to comfortably fit your wrist, add the pins back into the remaining unconnected links on the bracelet to reconnect them. Pay close attention to put the pin back the right way. It should be put in the pinhole through the same side of the link it was removed from, and should be facing the same way and be of the same orientation that it was originally. Pay close attention to the link’s arrows to achieve this.
Place and then push the pin back into the link’s pinhole manually at first, and then use the link removal tool to push it into the link until the point that it is not sticking out from either side, and is sitting relatively evenly between the link’s two pinholes. The pin should be sitting tight and secure in the link. Force should not be used during this process, and be extra careful to only press against the pin itself with the link removal tool, and to not hit the link itself during this process.
Repeat this on every link that is not connected with the rest of the bracelet until the watch is wearable and the pins are secure. Then, place the watch on your wrist and attempt to close the clasp. Be sure the watch fits comfortably when the clasp is closed, and is not too tight or too loose.
If it does fit comfortably, proceed to step 6. If it does not fit comfortably, then repeat the steps above to remove more links if it is too loose, or to add more links if it is too tight. Once a comfortable fit is achieved, proceed to step 6.
Step 6
Store any extra links and pins safely and securely, and do not lose them. We do not sell extra links or pins separately, nor are such parts covered under warranty. Store the link removal tool and any parts associated with it safely and securely, and do not lose the tool or any of its associated parts.
Please note: If you encounter any major difficulties during the bracelet resizing process, then please stop what you are doing and take it to a watch repair shop or reputable jeweler to get the bracelet resized professionally. Do not try and force any part of the process. Be especially careful with plated watches.
We reiterate that Pangino is not responsible under any circumstances for any scratches or damage that occurs during the bracelet resizing process. Most watch repair shops or reputable jewelers are able to do this process quickly and easily, and we highly recommend taking your watch to one if you aren’t experienced with this process.
While Pangino provides a link removal tool with every order, the providing of this tool does not mean that Pangino encourages every customer to attempt this process themselves. Additional tools not provided by Pangino may also be needed during this process, which are the sole responsibility of the customer to acquire, and not the responsibility of Pangino to provide.
Water Resistance Guidelines
About water resistance:
Water resistance in watches is measured in terms of atmosphere (ATM). These are measurements used in the watch industry to indicate how much pressure a watch can endure, not the depth to which the watch can be worn. This belief is a common misconception.
For example, if your watch is 5 ATM water resistant, this simply refers to how much pressure the watch case can withstand, not the depth to which it can be worn. When exposing any watch to water, ensure the crown is pushed in fully and seated securely, or screwed down completely if it is a screw down crown.
Most Pangino watches have a water resistance rating between 3 ATM and 5 ATM. If your Pangino watch falls within range, we DO NOT recommend prolonged exposure to or submerging in water, such as during swimming, showering, and any other extensive water contact activity.
Please adhere to our guidelines below based on your Pangino watch’s level of water resistance (which can be found on its caseback, marked next to “WATER RESISTANT” or “WR”, or in the specifications section of its product page on our website). Please also take into account whether your watch has a screw down crown or not.
If it does not, we do not recommend prolonged exposure to water. In general, unless classified as a dive watch with an appropriate level of water resistance, and a screw down crown (which should be screwed down during water contact), we do not recommend exposing any watch to water for a prolonged period of time.
Any water damage caused to any watch bought from Pangino, including damage caused by a lack of adherence to the water resistance guidelines, is not covered under warranty nor is it Pangino’s responsibility whatsoever.
Please note that water resistance ratings are not a permanent state of being. Exposure to harsh environments such as chlorinated pools, salt water, and any chemicals, can cause the gaskets (which seal the watch) to become weaker. This can compromise its level of water resistance. We recommend maintaining your watch by keeping it clean and dry, and free of any salt or chemicals.
Furthermore, we recommend avoiding the wearing of any watch while showering, regardless of its water resistance rating, as hot water or steam can fog the watch crystal or get moist air into the movement.
Levels of water resistance:
3 ATM / 30m / 100ft
Your watch can withstand most brief, light water contact that can occur during daily usage, such as accidental splashes from hand washing, light rain, or sweat. However, it is not suitable for being submerged into water at all, and should not be worn during swimming or showering, or any other extensive water activity.
We do not recommend showering with any watch, regardless of its water resistance rating, as hot water or steam has the potential to fog the watch crystal or get moist air into the movement.
5 ATM / 50m / 165ft
Your watch can withstand most water contact that can occur during daily usage, such as accidental splashes from hand washing, rain, or sweat. It is also suitable for occasional and brief exposure to shallow water for short time periods. However, it is not suitable for being exposed to or submerged under water for prolonged periods of time, such as during swims, water sports, or diving.
We do not recommend showering with any watch, regardless of its water resistance rating, as hot water or steam has the potential to fog the watch crystal or get moist air into the movement.
10 ATM / 100m / 330 ft
Your watch is suitable for being submerged in water during activities such as swimming, surfing, and snorkeling. However, it is not suitable for activities such as high-impact water sports, high board diving, aqua diving, or any sort of deep diving.
We do not recommend showering with any watch, regardless of its water resistance rating, as hot water or steam has the potential to fog the watch crystal or get moist air into the movement.
20 ATM / 200m / 660 ft
Your watch is suitable for being submerged in water during activities such as swimming, surfing, snorkeling, water sports, and some limited diving.
We do not recommend showering with any watch, regardless of its water resistance rating, as hot water or steam has the potential to fog the watch crystal or get moist air into the movement.
30 ATM and greater / 300m and greater / 990 ft and greater
Your watch is suitable for being submerged in water during activities such as swimming, surfing, snorkeling, high-impact water sports, scuba diving, or deep diving.
We do not recommend showering with any watch, regardless of its water resistance rating, as hot water or steam has the potential to fog the watch crystal or get moist air into the movement.
Maintaining Your Watch
- Clean your watch regularly using a microfiber jewelry cloth.
- Store your watch securely in the watch box it comes with, and close the box to prevent dust from getting in. Make sure it is kept in a dry place at normal room temperature.
- Keep your watch dry as much as possible. Check your gaskets and seals regularly.
- Avoid magnetic fields that can interfere with the workings of your watch.
- Do not use excessive force on the crown of your watch.
- Be gentle when handling your watch and avoid hitting or scratching it on surfaces.
- Do not wear your watch during particularly strenuous activities.
- Service your watch regularly with a watch repair shop or reputable jeweler every three to five years.
- The rubber seal and gaskets that keep dust and water out should be replaced every two to three years.
- Do not try to open the watch case or dismantle it.
- Avoid extreme temperatures.
- Avoid overexposure to sunlight.
- Avoid exposing your watch to harsh chemicals.
- Make sure your automatic watch is consistently wound.
- Do not wind the crown while your automatic watch is on your wrist, as this can create unnecessary pressure on the stem.
- Be especially careful not to drop your automatic watch while winding it, especially if you are over a hard surface.
Contact Us
Need assistance? Please feel free to reach out to us with any questions or concerns you may have.